


Introduction:
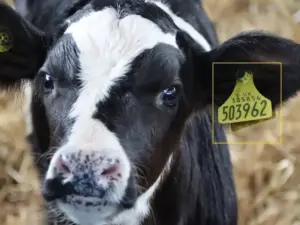
Ear tags for cattle are essential livestock management tools that assist farmers in identifying and keeping accurate records of their farm animals. A cattle ear tag can divulge any information ranging from gender to age, weight, and even the number of calves a cow has calved.
Applying ear tags for cattle might seem like a straightforward process; however, the procedure requires careful attention to ensure the comfort of the cow and also the efficiency of the tagging.
It is vital to understand the importance of identification, placement, and safety precautions before knowing how to apply ear tags in cattle.
In this guide, we will take you through the step-by-step process of applying cattle ear tags. Therefore, by the end of this article, you will gain the answer to the question, “How to apply cattle ear tag”.
How to apply cattle ear tag- Materials to Use
Before learning how to tag cattle ears, you should first gather the materials you’ll need to guarantee the success of the process. The tools you’ll need include:
1. Ear tags
Choose the appropriate tag based on your specific needs. Cattle ear tags come in various types, such as plastic, metal, flag-shaped and electronic tags. Make sure to select the right tags and colours to suit your preferences.
2. Tag applicator
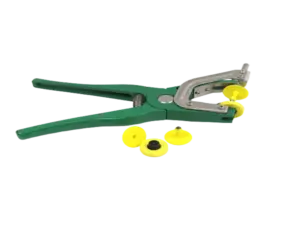
Ensure that the applicator is suitable for the type of cattle ear tag you have chosen because some varieties require specific applicators. Some applicators have inbuilt studs and buttons that help to attach certain types of cattle ear tags firmly. Above all, select an applicator that is user-friendly and enables precise tag placement.
3. Disinfectant solution
The disinfectant solution is used to sterilize the tag applicator and the cow’s ears before tagging. Disinfection helps to prevent infections and eliminates the risk of complications.
4. Record-keeping tools
These tools consist of a pen, paper or a digital device that serves to record accurate information about every tagged animal.
5. Additional considerations
This may involve a first aid kit and restraint instruments to handle unexpected injuries and secure the animal during tagging.
How to Tag Cattle Ears in 6 Steps
1. Secure the Cow
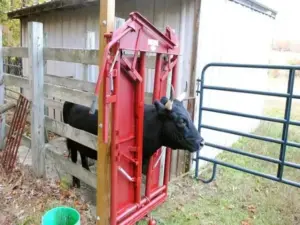
Before attaching a cattle ear tag to the animal, catching and carefully restricting its movements is necessary. A chute with a head gate is generally used to secure a full-grown cow. However, some farmers prefer to simply lay younger calves on their side when attaching the tag.
Attach a nose ring to the cow and guide it into the chute to tag a fully grown heifer or steer. After leading the animal inside, tie the lead rope firmly to one side of the gate. The knot should be tight enough only to allow a few inches of movement.
If you intend to tag a young calf, having an extra pair of hands around is best. Your assistant should help you keep the calf on the ground to prevent erratic movements.
The risk of injury increases if your cow moves excessively during tagging. Moreover, injuries could result in botched tagging that requires you to start all over. The easiest way to resolve this issue is to ensure that your animal is calm before you attach a cattle ear tag.
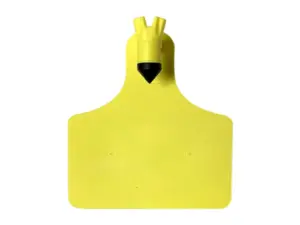
2. Choose the Best Tag for your Cattle
Depending on your preference and allocated budget, select a cattle ear tag that meets your requirements and provides comfort to your animal.
In general, conventional plastic tags are the most common types of ear tags for cattle in use today. They are also the cheapest and weigh less than metal tags. Plastic tags are the way to go if you want a cattle ear tag that allows you to boldly record a cow’s information while staying within a budget.
Alternatively, if you prefer a more modern approach to livestock management, you can opt for electronic RFID cattle ear tags. These tags allow the farmer to scan the animal and automatically collect accurate data quickly.
Ultimately, your choice rests on how willing you are to simplify the identification process, your budget, or the size of your herd.
3. Identify the Correct Tagging Spot
The next step is to identify the appropriate location on the cow’s ear for tag placement. Ideally, the most suitable spot for tagging is a soft place located in the middle part of the ear and in between the lower and upper cartilage.
This fleshy part offers the best visibility, presents minimal resistance and also causes the least discomfort to the cow. Always ensure to avoid the delicate base of the ear, ear canal and surrounding cartilage when attaching ear tags for cattle.
It is also helpful to understand a bit of cow ear anatomy before learning how to apply cattle ear tags. This knowledge will guarantee that you do not damage the fragile nerves located in the ear region.
4. Disinfect the Applicator and the Cow’s Ears
To prevent the development of infections, it is important to disinfect every material that will come into contact with your animal. Ensure that every tagging instrument is properly sterilized before applying the cattle ear tag.
Moreover, for added protection, make sure to clean the inner and outer surfaces of the cow’s ear with a cloth filled with alcohol. In addition, always remember to sterilize the applicator after each tagging session.
Once finished with cleaning your instruments, load the tag halves onto the applicator. Do so by inserting the pointed stud found on the back of the visual to the long slender pin, and fitting the button into the clip on the opposite arm of the applicator.
Before you proceed, double-check that both pieces are firmly and securely attached. You should also do a test run to see if the stud and hole are centrally aligned. However, be careful not to close the applicator jaw completely, or else you’ll waste the tag.
5. Apply the Cattle Ear Tag
After making the necessary preparations, you are ready for the final step on “how to apply cattle ear tag”.
With your dominant hand, hold your applicator and use your free hand to stretch and flatten the cow’s ears. Remember to place the jaws of your applicator over the fleshy part of the ear you identified earlier.
Thereafter, in one smooth motion, squeeze the handles together. You should hear a loud click as the two halves of the tag merge. Once you’ve completed this step, you may release your grip on the handles and pull the applicator away.
Although the process of applying a cattle ear tag is quick, the momentary pain the animal feels may induce fear and panic. To relieve the cow’s distress, speak to it softly in a soothing voice and gently stroke its head and neck while avoiding the newly tagged ear.
6. Inspection and Check-ups
After applying the cattle ear tag, check to ensure that it is secure and correctly placed. Make sure the cow is not feeling any prolonged discomfort and repeat the process if you decide to tag the second ear.
After this, you may release the cow from its bindings and let it go on its merry way. Ear tags for cattle can stay in place for several years and allow you to easily track and identify every individual member of the herd.
Keep an eye out for signs of infections around the tagging site for the next five to seven days. If you notice an unhealthy level of swelling, redness or discharge, treat it as a serious issue.
You can attempt treatment with disinfectant for three to five days. But if the infection shows no sign of clearing afterwards, contact a large animal veterinarian for more professional treatment.